Howdy! Today, I come bearing the gift of a tutorial! After painting two MG IBO Gundam Frames entirely with metallics, I feel pretty confident in giving you this: my guide to painting metallic colors!
I'm very proud of how my metallic stuff often turns out and hope you'll find this guide useful the next time you go to put some shiny paint down on a model kit. As always, work in a well ventilated area and wear proper PPE when working with any kind of paint.
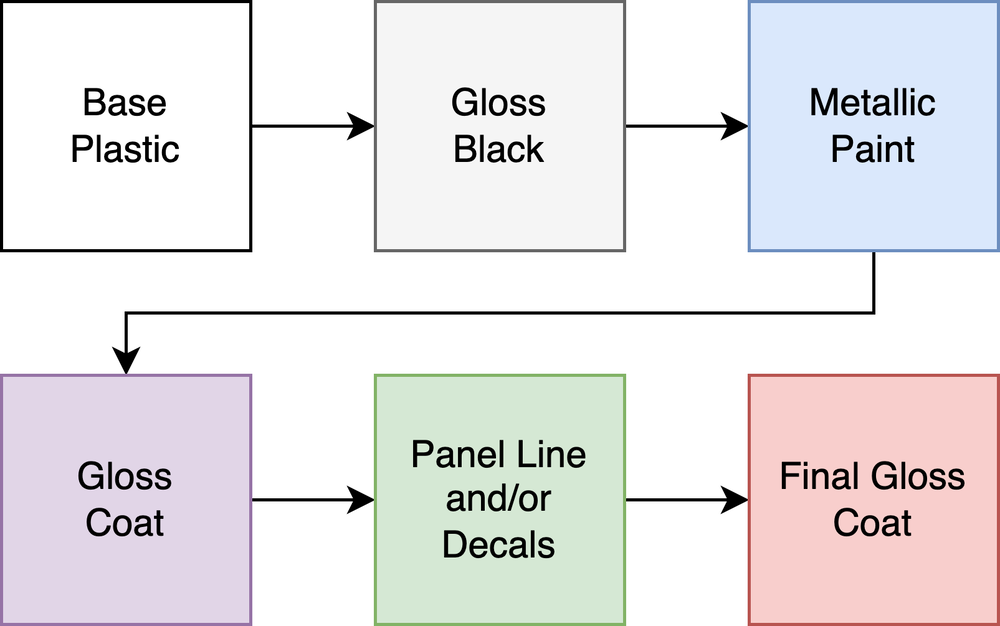
Let’s break down each part of the above flow chart!
Bare plastic
Surface preparation is key. Use a dust brush and spray booth to make sure that no sanding residue or dust are on the surface of your part. You can wet-sand the surface of the parts with high grit (2000+) sandpaper if you’d like but I have found it’s not exactly required to get a nice finish.
Gloss black layer
Find the glossiest lacquer paint you can. Some great options are GaiaNotes’ Ultimate Black, Mr. Color GX Ueno Black, and SMS jet black. Thin heavily with levelling thinner (1.75:1 thinner:paint) and spray on to parts in 3-4 light coats (or until the part is coated without paint pooling) at 12-17 PSI.
Give everything at least 4 hours of cure time, or a full day for best results. You read that right, by the way. I spray glossy black paint right on to the bare plastic. I don't argue with the results I've gotten, and it saves on using expensive primer. I also recommend levelling thinner because it extends the drying time of paint, giving it more time to level out which results in a glossier finish.
Metallic paint layer
If you have access to it, GaiaNotes’ “Metal Master” thinner is very nice to use for thinning metallic paints but Mr. Hobby’s Mr. Levelling thinner is fine too. You can also do half-and-half MM/LT. Thin your metallic paint (1.75:1 thinner:paint), shake well and spray at 15-18 PSI through at least a 0.3mm nozzle for good results, though a .5mm nozzle might be more ideal due to metallic paint having metal flakes in it, which can be tougher to get to pass through a smaller nozzle.
If you’re painting chrome colors, only do one or two very thin coats and wait for it to dry for about an hour before adding more. Chrome paint is very sensitive to the glossiness of the black coat underneath it to create the mirror effect and applying chrome paint too heavily will result in the chrome effect being lost.
Avoid handling metallic/chrome paint until it's fully cured, otherwise it'll come off on your hands and the shine won't be as bright.
GaiaNotes’ Metal Master thinner is "formulated to better break down the metal flakes in metallic paint, giving you a smoother finish". It's the real deal, and really does. My metallic paint has looked leagues better since switching. This also helps you get away with spraying metallic paint through a smaller nozzle.
Gloss coat // Aqua gloss coat
Mr. Color GX super smooth clear (GX112) is my preferred gloss coat. Thin (1.5:1 thinner:paint) with levelling thinner and spray at 12-15 PSI in light coats, until the part looks ‘wet’ without paint pooling anywhere. It can be tricky to see how much coverage you’re getting due to the clear nature of the paint- what I like to do is find an angle that really reflects light from my desk lamp in the wet paint so I can make sure my layers are even.
If you’re gloss coating chrome paint, Alclad II’s “Aqua Gloss” topcoat (no thinner required) is a better option than standard topcoats because it’ll dull the chrome effect less. However, you must give Aqua Gloss a full day (24 hours) to cure.
Panel line/decals
Apply panel lining and decals like normal, if applicable.
Final gloss coat // Aqua gloss coat
Apply another coat of GX112/Aqua gloss to seal in all of the panel lining and decal work on the previous layer and protect the finish on your metallic paint.
Congratulations, it looks great!
This wasn't too hard to make and I'd like to make more guides like this for painting "standard" builds, alongside weathered ones! I know guides are already out there...but what's wrong with more info being readily available, right? If this guide helped you, great! If you have any feedback or questions, I’d love to hear them.
Enjoy painting your model kit!